MCP Overview
LiteLLM Proxy provides an MCP Gateway that allows you to use a fixed endpoint for all MCP tools and control MCP access by Key, Team.
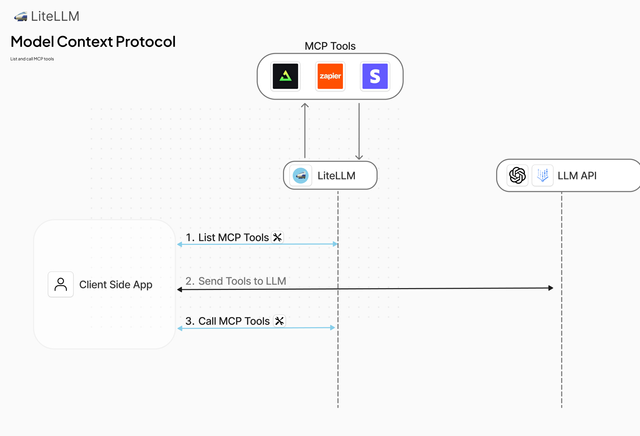
LiteLLM MCP Architecture: Use MCP tools with all LiteLLM supported models
Overview
| Feature | Description |
|---|---|
| MCP Operations | • List Tools • Call Tools |
| Supported MCP Transports | • Streamable HTTP • SSE • Standard Input/Output (stdio) |
| LiteLLM Permission Management | • By Key • By Team • By Organization |
Adding your MCP
Prerequisites
To store MCP servers in the database, you need to enable database storage:
Environment Variable:
export STORE_MODEL_IN_DB=True
OR in config.yaml:
general_settings:
  store_model_in_db: true
Fine-grained Database Storage Control
By default, when store_model_in_db is true, all object types (models, MCPs, guardrails, vector stores, etc.) are stored in the database. If you want to store only specific object types, use the supported_db_objects setting.
Example: Store only MCP servers in the database
general_settings:
  store_model_in_db: true
  supported_db_objects: ["mcp"]  # Only store MCP servers in DB

model_list:
  - model_name: gpt-4o
    litellm_params:
      model: openai/gpt-4o
      api_key: sk-xxxxxxx
See all available object types: Config Settings - supported_db_objects
If supported_db_objects is not set, all object types are loaded from the database (default behavior).
- LiteLLM UI
- config.yaml
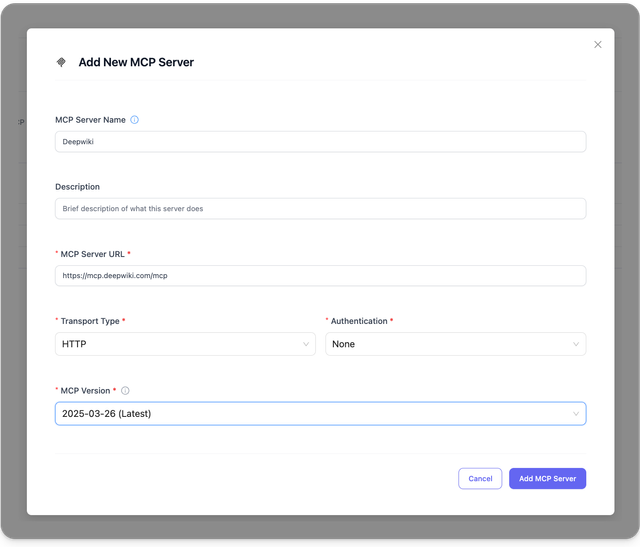
On the LiteLLM UI, Navigate to "MCP Servers" and click "Add New MCP Server".
On this form, you should enter your MCP Server URL and the transport you want to use.
LiteLLM supports the following MCP transports:
- Streamable HTTP
- SSE (Server-Sent Events)
- Standard Input/Output (stdio)
Add HTTP MCP Server
This video walks through adding and using an HTTP MCP server on LiteLLM UI and using it in Cursor IDE.
Add SSE MCP Server
This video walks through adding and using an SSE MCP server on LiteLLM UI and using it in Cursor IDE.
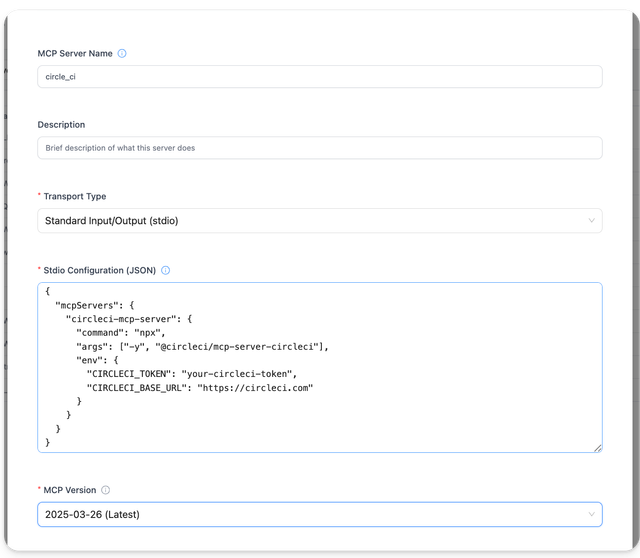
Add STDIO MCP Server
For stdio MCP servers, select "Standard Input/Output (stdio)" as the transport type and provide the stdio configuration in JSON format:
Add your MCP servers directly in your config.yaml file:
model_list:
  - model_name: gpt-4o
    litellm_params:
      model: openai/gpt-4o
      api_key: sk-xxxxxxx

litellm_settings:
  # MCP Aliases - Map aliases to server names for easier tool access
  mcp_aliases:
    "github": "github_mcp_server"
    "zapier": "zapier_mcp_server"
    "deepwiki": "deepwiki_mcp_server"

mcp_servers:
  # HTTP Streamable Server
  deepwiki_mcp:
    url: "https://mcp.deepwiki.com/mcp"
  # SSE Server
  zapier_mcp:
    url: "https://actions.zapier.com/mcp/sk-akxxxxx/sse"

  # Standard Input/Output (stdio) Server - CircleCI Example
  circleci_mcp:
    transport: "stdio"
    command: "npx"
    args: ["-y", "@circleci/mcp-server-circleci"]
    env:
      CIRCLECI_TOKEN: "your-circleci-token"
      CIRCLECI_BASE_URL: "https://circleci.com"

  # Full configuration with all optional fields
  my_http_server:
    url: "https://my-mcp-server.com/mcp"
    transport: "http"
    description: "My custom MCP server"
    auth_type: "api_key"
    auth_value: "abc123"
Configuration Options:
-
Server Name: Use any descriptive name for your MCP server (e.g.,
zapier_mcp,deepwiki_mcp,circleci_mcp) -
Alias: This name will be prefilled with the server name with "_" replacing spaces, else edit it to be the prefix in tool names
-
URL: The endpoint URL for your MCP server (required for HTTP/SSE transports)
-
Transport: Optional transport type (defaults to
sse)sse- SSE (Server-Sent Events) transporthttp- Streamable HTTP transportstdio- Standard Input/Output transport
-
Command: The command to execute for stdio transport (required for stdio)
-
Args: Array of arguments to pass to the command (optional for stdio)
-
Env: Environment variables to set for the stdio process (optional for stdio)
-
Description: Optional description for the server
-
Auth Type: Optional authentication type. Supported values:
Value Header sent api_keyX-API-Key: <auth_value>bearer_tokenAuthorization: Bearer <auth_value>basicAuthorization: Basic <auth_value>authorizationAuthorization: <auth_value> -
Extra Headers: Optional list of additional header names that should be forwarded from client to the MCP server
-
Spec Version: Optional MCP specification version (defaults to
2025-06-18)
Examples for each auth type:
mcp_servers:
  api_key_example:
    url: "https://my-mcp-server.com/mcp"
    auth_type: "api_key"
    auth_value: "abc123"        # headers={"X-API-Key": "abc123"}

  # NEW – OAuth 2.0 Client Credentials (v1.77.5)
  oauth2_example:
    url: "https://my-mcp-server.com/mcp"
    auth_type: "oauth2"         # 👈 KEY CHANGE
    authorization_url: "https://my-mcp-server.com/oauth/authorize" # optional for client-credentials
    token_url: "https://my-mcp-server.com/oauth/token"             # required
    client_id: os.environ/OAUTH_CLIENT_ID
    client_secret: os.environ/OAUTH_CLIENT_SECRET
    scopes: ["tool.read", "tool.write"] # optional

  bearer_example:
    url: "https://my-mcp-server.com/mcp"
    auth_type: "bearer_token"
    auth_value: "abc123"        # headers={"Authorization": "Bearer abc123"}

  basic_example:
    url: "https://my-mcp-server.com/mcp"
    auth_type: "basic"
    auth_value: "dXNlcjpwYXNz"  # headers={"Authorization": "Basic dXNlcjpwYXNz"}

  custom_auth_example:
    url: "https://my-mcp-server.com/mcp"
    auth_type: "authorization"
    auth_value: "Token example123"  # headers={"Authorization": "Token example123"}

  # Example with extra headers forwarding
  github_mcp:
    url: "https://api.githubcopilot.com/mcp"
    auth_type: "bearer_token"
    auth_value: "ghp_example_token"
    extra_headers: ["custom_key", "x-custom-header"]  # These headers will be forwarded from client
MCP Aliases
You can define aliases for your MCP servers in the litellm_settings section. This allows you to:
- Map friendly names to server names: Use shorter, more memorable aliases
- Override server aliases: If a server doesn't have an alias defined, the system will use the first matching alias from
mcp_aliases - Ensure uniqueness: Only the first alias for each server is used, preventing conflicts
Example:
litellm_settings:
  mcp_aliases:
    "github": "github_mcp_server"      # Maps "github" alias to "github_mcp_server"
    "zapier": "zapier_mcp_server"      # Maps "zapier" alias to "zapier_mcp_server"
    "docs": "deepwiki_mcp_server"      # Maps "docs" alias to "deepwiki_mcp_server"
    "github_alt": "github_mcp_server"  # This will be ignored since "github" already maps to this server
Benefits:
- Simplified tool access: Use
github_create_issueinstead ofgithub_mcp_server_create_issue - Consistent naming: Standardize alias patterns across your organization
- Easy migration: Change server names without breaking existing tool references
MCP Tool Filtering
Control which tools are available from your MCP servers. You can either allow only specific tools or block dangerous ones.
- Only Allow Specific Tools
- Block Specific Tools
Use allowed_tools to specify exactly which tools users can access. All other tools will be blocked.
mcp_servers:
  github_mcp:
    url: "https://api.githubcopilot.com/mcp"
    auth_type: oauth2
    authorization_url: https://github.com/login/oauth/authorize
    token_url: https://github.com/login/oauth/access_token
    client_id: os.environ/GITHUB_OAUTH_CLIENT_ID
    client_secret: os.environ/GITHUB_OAUTH_CLIENT_SECRET
    scopes: ["public_repo", "user:email"]
    allowed_tools: ["list_tools"]
    # only list_tools will be available
Use this when:
- You want strict control over which tools are available
- You're in a high-security environment
- You're testing a new MCP server with limited tools
Use disallowed_tools to block specific tools. All other tools will be available.
mcp_servers:
  github_mcp:
    url: "https://api.githubcopilot.com/mcp"
    auth_type: oauth2
    authorization_url: https://github.com/login/oauth/authorize
    token_url: https://github.com/login/oauth/access_token
    client_id: os.environ/GITHUB_OAUTH_CLIENT_ID
    client_secret: os.environ/GITHUB_OAUTH_CLIENT_SECRET
    scopes: ["public_repo", "user:email"]
    disallowed_tools: ["repo_delete"]
    # only repo_delete will be blocked
Use this when:
- Most tools are safe, but you want to block a few dangerous ones
- You want to prevent expensive API calls
- You're gradually adding restrictions to an existing server
Important Notes
- If you specify both
allowed_toolsanddisallowed_tools, the allowed list takes priority - Tool names are case-sensitive
MCP Server Access Control
LiteLLM Proxy provides two methods for controlling access to specific MCP servers:
- URL-based Namespacing - Use URL paths to directly access specific servers or access groups
- Header-based Namespacing - Use the
x-mcp-serversheader to specify which servers to access
Method 1: URL-based Namespacing
LiteLLM Proxy supports URL-based namespacing for MCP servers using the format /mcp/<servers or access groups>. This allows you to:
- Direct URL Access: Point MCP clients directly to specific servers or access groups via URL
- Simplified Configuration: Use URLs instead of headers for server selection
- Access Group Support: Use access group names in URLs for grouped server access
URL Format
<your-litellm-proxy-base-url>/mcp/<server_alias_or_access_group>
Examples:
/mcp/github- Access tools from the "github" MCP server/mcp/zapier- Access tools from the "zapier" MCP server/mcp/dev_group- Access tools from all servers in the "dev_group" access group/mcp/github,zapier- Access tools from multiple specific servers
Usage Examples
- OpenAI API
- LiteLLM Proxy
- Cursor IDE
curl --location 'https://api.openai.com/v1/responses' \
--header 'Content-Type: application/json' \
--header "Authorization: Bearer $OPENAI_API_KEY" \
--data '{
    "model": "gpt-4o",
    "tools": [
        {
            "type": "mcp",
            "server_label": "litellm",
            "server_url": "<your-litellm-proxy-base-url>/mcp/github",
            "require_approval": "never",
            "headers": {
                "x-litellm-api-key": "Bearer YOUR_LITELLM_API_KEY"
            }
        }
    ],
    "input": "Run available tools",
    "tool_choice": "required"
}'
This example uses URL namespacing to access only the "github" MCP server.
curl --location '<your-litellm-proxy-base-url>/v1/responses' \
--header 'Content-Type: application/json' \
--header "Authorization: Bearer $LITELLM_API_KEY" \
--data '{
    "model": "gpt-4o",
    "tools": [
        {
            "type": "mcp",
            "server_label": "litellm",
            "server_url": "<your-litellm-proxy-base-url>/mcp/dev_group",
            "require_approval": "never",
            "headers": {
                "x-litellm-api-key": "Bearer YOUR_LITELLM_API_KEY"
            }
        }
    ],
    "input": "Run available tools",
    "tool_choice": "required"
}'
This example uses URL namespacing to access all servers in the "dev_group" access group.
{
  "mcpServers": {
    "LiteLLM": {
      "url": "<your-litellm-proxy-base-url>/mcp/github,zapier",
      "headers": {
        "x-litellm-api-key": "Bearer $LITELLM_API_KEY"
      }
    }
  }
}
This configuration uses URL namespacing to access tools from both "github" and "zapier" MCP servers.
Benefits of URL Namespacing
- Direct Access: No need for additional headers to specify servers
- Clean URLs: Self-documenting URLs that clearly indicate which servers are accessible
- Access Group Support: Use access group names for grouped server access
- Multiple Servers: Specify multiple servers in a single URL with comma separation
- Simplified Configuration: Easier setup for MCP clients that prefer URL-based configuration
Method 2: Header-based Namespacing
You can choose to access specific MCP servers and only list their tools using the x-mcp-servers header. This header allows you to:
- Limit tool access to one or more specific MCP servers
- Control which tools are available in different environments or use cases
The header accepts a comma-separated list of server aliases: "alias_1,Server2,Server3"
Notes:
- If the header is not provided, tools from all available MCP servers will be accessible
- This method works with the standard LiteLLM MCP endpoint
- OpenAI API
- LiteLLM Proxy
- Cursor IDE
curl --location 'https://api.openai.com/v1/responses' \
--header 'Content-Type: application/json' \
--header "Authorization: Bearer $OPENAI_API_KEY" \
--data '{
    "model": "gpt-4o",
    "tools": [
        {
            "type": "mcp",
            "server_label": "litellm",
            "server_url": "<your-litellm-proxy-base-url>/mcp/",
            "require_approval": "never",
            "headers": {
                "x-litellm-api-key": "Bearer YOUR_LITELLM_API_KEY",
                "x-mcp-servers": "alias_1"
            }
        }
    ],
    "input": "Run available tools",
    "tool_choice": "required"
}'
In this example, the request will only have access to tools from the "alias_1" MCP server.
curl --location '<your-litellm-proxy-base-url>/v1/responses' \
--header 'Content-Type: application/json' \
--header "Authorization: Bearer $LITELLM_API_KEY" \
--data '{
    "model": "gpt-4o",
    "tools": [
        {
            "type": "mcp",
            "server_label": "litellm",
            "server_url": "<your-litellm-proxy-base-url>/mcp/",
            "require_approval": "never",
            "headers": {
                "x-litellm-api-key": "Bearer YOUR_LITELLM_API_KEY",
                "x-mcp-servers": "alias_1,Server2"
            }
        }
    ],
    "input": "Run available tools",
    "tool_choice": "required"
}'
This configuration restricts the request to only use tools from the specified MCP servers.
{
  "mcpServers": {
    "LiteLLM": {
      "url": "<your-litellm-proxy-base-url>/mcp/",
      "headers": {
        "x-litellm-api-key": "Bearer $LITELLM_API_KEY",
        "x-mcp-servers": "alias_1,Server2"
      }
    }
  }
}
This configuration in Cursor IDE settings will limit tool access to only the specified MCP servers.
Comparison: Header vs URL Namespacing
| Feature | Header Namespacing | URL Namespacing |
|---|---|---|
| Method | Uses x-mcp-servers header | Uses URL path /mcp/<servers> |
| Endpoint | Standard litellm_proxy endpoint | Custom /mcp/<servers> endpoint |
| Configuration | Requires additional header | Self-contained in URL |
| Multiple Servers | Comma-separated in header | Comma-separated in URL path |
| Access Groups | Supported via header | Supported via URL path |
| Client Support | Works with all MCP clients | Works with URL-aware MCP clients |
| Use Case | Dynamic server selection | Fixed server configuration |
- OpenAI API
- LiteLLM Proxy
- Cursor IDE
curl --location 'https://api.openai.com/v1/responses' \
--header 'Content-Type: application/json' \
--header "Authorization: Bearer $OPENAI_API_KEY" \
--data '{
    "model": "gpt-4o",
    "tools": [
        {
            "type": "mcp",
            "server_label": "litellm",
            "server_url": "<your-litellm-proxy-base-url>/mcp/",
            "require_approval": "never",
            "headers": {
                "x-litellm-api-key": "Bearer YOUR_LITELLM_API_KEY",
                "x-mcp-servers": "alias_1"
            }
        }
    ],
    "input": "Run available tools",
    "tool_choice": "required"
}'
In this example, the request will only have access to tools from the "alias_1" MCP server.
curl --location '<your-litellm-proxy-base-url>/v1/responses' \
--header 'Content-Type: application/json' \
--header "Authorization: Bearer $LITELLM_API_KEY" \
--data '{
    "model": "gpt-4o",
    "tools": [
        {
            "type": "mcp",
            "server_label": "litellm",
            "server_url": "litellm_proxy",
            "require_approval": "never",
            "headers": {
                "x-litellm-api-key": "Bearer YOUR_LITELLM_API_KEY",
                "x-mcp-servers": "alias_1,Server2"
            }
        }
    ],
    "input": "Run available tools",
    "tool_choice": "required"
}'
This configuration restricts the request to only use tools from the specified MCP servers.
{
  "mcpServers": {
    "LiteLLM": {
      "url": "litellm_proxy",
      "headers": {
        "x-litellm-api-key": "Bearer $LITELLM_API_KEY",
        "x-mcp-servers": "alias_1,Server2"
      }
    }
  }
}
This configuration in Cursor IDE settings will limit tool access to only the specified MCP server.
Grouping MCPs (Access Groups)
MCP Access Groups allow you to group multiple MCP servers together for easier management.
1. Create an Access Group
A. Creating Access Groups using Config:
mcp_servers:
  "deepwiki_mcp":
    url: https://mcp.deepwiki.com/mcp
    transport: "http"
    auth_type: "none"
    access_groups: ["dev_group"]
While adding mcp_servers using the config:
- Pass in a list of strings inside
access_groups - These groups can then be used for segregating access using keys, teams and MCP clients using headers
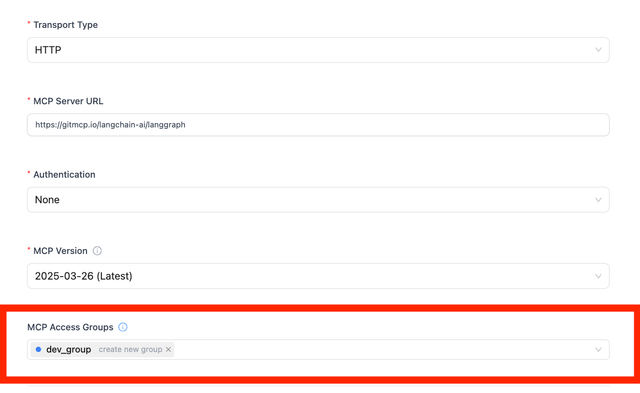
B. Creating Access Groups using UI
To create an access group:
- Go to MCP Servers in the LiteLLM UI
- Click "Add a New MCP Server"
- Under "MCP Access Groups", create a new group (e.g., "dev_group") by typing it
- Add the same group name to other servers to group them together
2. Use Access Group in Cursor
Include the access group name in the x-mcp-servers header:
{
  "mcpServers": {
    "LiteLLM": {
      "url": "litellm_proxy",
      "headers": {
        "x-litellm-api-key": "Bearer $LITELLM_API_KEY",
        "x-mcp-servers": "dev_group"
      }
    }
  }
}
This gives you access to all servers in the "dev_group" access group.
- Which means that if deepwiki server (and any other servers) which have the access group
dev_groupassigned to them will be available for tool calling
Advanced: Connecting Access Groups to API Keys
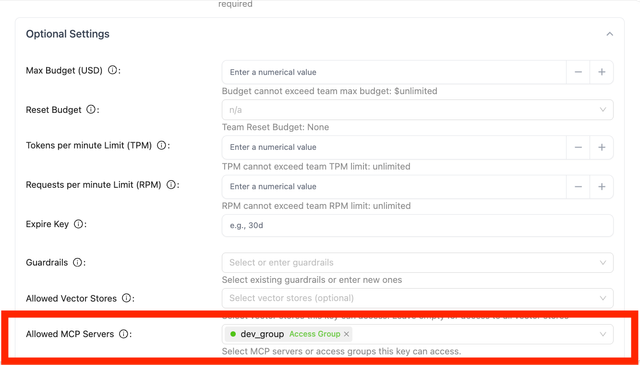
When creating API keys, you can assign them to specific access groups for permission management:
- Go to "Keys" in the LiteLLM UI and click "Create Key"
- Select the desired MCP access groups from the dropdown
- The key will have access to all MCP servers in those groups
- This is reflected in the Test Key page
Forwarding Custom Headers to MCP Servers
LiteLLM supports forwarding additional custom headers from MCP clients to backend MCP servers using the extra_headers configuration parameter. This allows you to pass custom authentication tokens, API keys, or other headers that your MCP server requires.
Configuration
- config.yaml
- Dynamically on Client Side
Configure extra_headers in your MCP server configuration to specify which header names should be forwarded:
mcp_servers:
  github_mcp:
    url: "https://api.githubcopilot.com/mcp"
    auth_type: "bearer_token"
    auth_value: "ghp_default_token"
    extra_headers: ["custom_key", "x-custom-header", "Authorization"]
    description: "GitHub MCP server with custom header forwarding"
Use this when giving users access to a group of MCP servers.
Format: x-mcp-{server_alias}-{header_name}: value
This allows you to use different authentication for different MCP servers.
Examples:
x-mcp-github-authorization: Bearer ghp_xxxxxxxxx- GitHub MCP server with Bearer tokenx-mcp-zapier-x-api-key: sk-xxxxxxxxx- Zapier MCP server with API keyx-mcp-deepwiki-authorization: Basic base64_encoded_creds- DeepWiki MCP server with Basic auth
from fastmcp import Client
import asyncio

# Standard MCP configuration with multiple servers
config = {
    "mcpServers": {
        "mcp_group": {
            "url": "http://localhost:4000/mcp",
            "headers": {
                "x-mcp-servers": "dev_group", # assume this gives access to github, zapier and deepwiki
                "x-litellm-api-key": "Bearer sk-1234",
                "x-mcp-github-authorization": "Bearer gho_token",
                "x-mcp-zapier-x-api-key": "sk-xxxxxxxxx",
                "x-mcp-deepwiki-authorization": "Basic base64_encoded_creds",
                "custom_key": "value"
            }
        }
    }
}

# Create a client that connects to all servers
client = Client(config)


async def main():
    async with client:
        tools = await client.list_tools()
        print(f"Available tools: {tools}")

        # call mcp
        await client.call_tool(
            name="github_mcp-search_issues",
            arguments={'query': 'created:>2024-01-01', 'sort': 'created', 'order': 'desc', 'perPage': 30}
        )

if __name__ == "__main__":
    asyncio.run(main())
Benefits:
- Server-specific authentication: Each MCP server can use different auth methods
- Better security: No need to share the same auth token across all servers
- Flexible header names: Support for different auth header types (authorization, x-api-key, etc.)
- Clean separation: Each server's auth is clearly identified
Client Usage
When connecting from MCP clients, include the custom headers that match the extra_headers configuration:
- Python FastMCP
- Cursor IDE
- HTTP Client
from fastmcp import Client
import asyncio

# MCP client configuration with custom headers
config = {
    "mcpServers": {
        "github": {
            "url": "http://localhost:4000/github_mcp/mcp",
            "headers": {
                "x-litellm-api-key": "Bearer sk-1234",
                "Authorization": "Bearer gho_token",
                "custom_key": "custom_value",
                "x-custom-header": "additional_data"
            }
        }
    }
}

# Create a client that connects to the server
client = Client(config)

async def main():
    async with client:
        # List available tools
        tools = await client.list_tools()
        print(f"Available tools: {tools}")

        # Call a tool if available
        if tools:
            result = await client.call_tool(tools[0].name, {})
            print(f"Tool result: {result}")

# Run the client
asyncio.run(main())
{
  "mcpServers": {
    "GitHub": {
      "url": "http://localhost:4000/github_mcp/mcp",
      "headers": {
        "x-litellm-api-key": "Bearer $LITELLM_API_KEY",
        "Authorization": "Bearer $GITHUB_TOKEN",
        "custom_key": "custom_value",
        "x-custom-header": "additional_data"
      }
    }
  }
}
curl --location 'http://localhost:4000/github_mcp/mcp' \
--header 'Content-Type: application/json' \
--header 'x-litellm-api-key: Bearer sk-1234' \
--header 'Authorization: Bearer gho_token' \
--header 'custom_key: custom_value' \
--header 'x-custom-header: additional_data' \
--data '{
    "jsonrpc": "2.0",
    "id": 1,
    "method": "tools/list"
}'
How It Works
- Configuration: Define
extra_headersin your MCP server config with the header names you want to forward - Client Headers: Include the corresponding headers in your MCP client requests
- Header Forwarding: LiteLLM automatically forwards matching headers to the backend MCP server
- Authentication: The backend MCP server receives both the configured auth headers and the custom headers
Use Cases
- Custom Authentication: Forward custom API keys or tokens required by specific MCP servers
- Request Context: Pass user identification, session data, or request tracking headers
- Third-party Integration: Include headers required by external services that your MCP server integrates with
- Multi-tenant Systems: Forward tenant-specific headers for proper request routing
Security Considerations
- Only headers listed in
extra_headersare forwarded to maintain security - Sensitive headers should be passed through environment variables when possible
- Consider using server-specific auth headers for better security isolation
MCP Oauth
LiteLLM v 1.77.6 added support for OAuth 2.0 Client Credentials for MCP servers.
This configuration is currently available on the config.yaml, with UI support coming soon.
mcp_servers:
  github_mcp:
    url: "https://api.githubcopilot.com/mcp"
    auth_type: oauth2
    authorization_url: https://github.com/login/oauth/authorize
    token_url: https://github.com/login/oauth/access_token
    client_id: os.environ/GITHUB_OAUTH_CLIENT_ID
    client_secret: os.environ/GITHUB_OAUTH_CLIENT_SECRET
    scopes: ["public_repo", "user:email"]
Using your MCP with client side credentials
Use this if you want to pass a client side authentication token to LiteLLM to then pass to your MCP to auth to your MCP.
New Server-Specific Auth Headers (Recommended)
You can specify MCP auth tokens using server-specific headers in the format x-mcp-{server_alias}-{header_name}. This allows you to use different authentication for different MCP servers.
Benefits:
- Server-specific authentication: Each MCP server can use different auth methods
- Better security: No need to share the same auth token across all servers
- Flexible header names: Support for different auth header types (authorization, x-api-key, etc.)
- Clean separation: Each server's auth is clearly identified
Legacy Auth Header (Deprecated)
You can also specify your MCP auth token using the header x-mcp-auth. This will be forwarded to all MCP servers and is deprecated in favor of server-specific headers.
- OpenAI API
- LiteLLM Proxy
- Cursor IDE
- Streamable HTTP
- Python FastMCP
Connect via OpenAI Responses API with Server-Specific Auth
Use the OpenAI Responses API and include server-specific auth headers:
curl --location 'https://api.openai.com/v1/responses' \
--header 'Content-Type: application/json' \
--header "Authorization: Bearer $OPENAI_API_KEY" \
--data '{
    "model": "gpt-4o",
    "tools": [
        {
            "type": "mcp",
            "server_label": "litellm",
            "server_url": "litellm_proxy",
            "require_approval": "never",
            "headers": {
                "x-litellm-api-key": "Bearer YOUR_LITELLM_API_KEY",
                "x-mcp-github-authorization": "Bearer YOUR_GITHUB_TOKEN",
                "x-mcp-zapier-x-api-key": "YOUR_ZAPIER_API_KEY"
            }
        }
    ],
    "input": "Run available tools",
    "tool_choice": "required"
}'
Connect via OpenAI Responses API with Legacy Auth
Use the OpenAI Responses API and include the x-mcp-auth header for your MCP server authentication:
curl --location 'https://api.openai.com/v1/responses' \
--header 'Content-Type: application/json' \
--header "Authorization: Bearer $OPENAI_API_KEY" \
--data '{
    "model": "gpt-4o",
    "tools": [
        {
            "type": "mcp",
            "server_label": "litellm",
            "server_url": "litellm_proxy",
            "require_approval": "never",
            "headers": {
                "x-litellm-api-key": "Bearer YOUR_LITELLM_API_KEY",
                "x-mcp-auth": YOUR_MCP_AUTH_TOKEN
            }
        }
    ],
    "input": "Run available tools",
    "tool_choice": "required"
}'
Connect via LiteLLM Proxy Responses API with Server-Specific Auth
Use this when calling LiteLLM Proxy for LLM API requests to /v1/responses endpoint with server-specific authentication:
curl --location '<your-litellm-proxy-base-url>/v1/responses' \
--header 'Content-Type: application/json' \
--header "Authorization: Bearer $LITELLM_API_KEY" \
--data '{
    "model": "gpt-4o",
    "tools": [
        {
            "type": "mcp",
            "server_label": "litellm",
            "server_url": "litellm_proxy",
            "require_approval": "never",
            "headers": {
                "x-litellm-api-key": "Bearer YOUR_LITELLM_API_KEY",
                "x-mcp-github-authorization": "Bearer YOUR_GITHUB_TOKEN",
                "x-mcp-zapier-x-api-key": "YOUR_ZAPIER_API_KEY"
            }
        }
    ],
    "input": "Run available tools",
    "tool_choice": "required"
}'
Connect via LiteLLM Proxy Responses API with Legacy Auth
Use this when calling LiteLLM Proxy for LLM API requests to /v1/responses endpoint with MCP authentication:
curl --location '<your-litellm-proxy-base-url>/v1/responses' \
--header 'Content-Type: application/json' \
--header "Authorization: Bearer $LITELLM_API_KEY" \
--data '{
    "model": "gpt-4o",
    "tools": [
        {
            "type": "mcp",
            "server_label": "litellm",
            "server_url": "litellm_proxy",
            "require_approval": "never",
            "headers": {
                "x-litellm-api-key": "Bearer YOUR_LITELLM_API_KEY",
                "x-mcp-auth": "YOUR_MCP_AUTH_TOKEN"
            }
        }
    ],
    "input": "Run available tools",
    "tool_choice": "required"
}'
Connect via Cursor IDE with Server-Specific Auth
Use tools directly from Cursor IDE with LiteLLM MCP and include server-specific authentication:
Setup Instructions:
- Open Cursor Settings: Use
⇧+⌘+J(Mac) orCtrl+Shift+J(Windows/Linux) - Navigate to MCP Tools: Go to the "MCP Tools" tab and click "New MCP Server"
- Add Configuration: Copy and paste the JSON configuration below, then save with
Cmd+SorCtrl+S
{
  "mcpServers": {
    "LiteLLM": {
      "url": "litellm_proxy",
      "headers": {
        "x-litellm-api-key": "Bearer $LITELLM_API_KEY",
        "x-mcp-github-authorization": "Bearer $GITHUB_TOKEN",
        "x-mcp-zapier-x-api-key": "$ZAPIER_API_KEY"
      }
    }
  }
}
Connect via Cursor IDE with Legacy Auth
Use tools directly from Cursor IDE with LiteLLM MCP and include your MCP authentication token:
Setup Instructions:
- Open Cursor Settings: Use
⇧+⌘+J(Mac) orCtrl+Shift+J(Windows/Linux) - Navigate to MCP Tools: Go to the "MCP Tools" tab and click "New MCP Server"
- Add Configuration: Copy and paste the JSON configuration below, then save with
Cmd+SorCtrl+S
{
  "mcpServers": {
    "LiteLLM": {
      "url": "litellm_proxy",
      "headers": {
        "x-litellm-api-key": "Bearer $LITELLM_API_KEY",
        "x-mcp-auth": "$MCP_AUTH_TOKEN"
      }
    }
  }
}
Connect via Streamable HTTP Transport with Server-Specific Auth
Connect to LiteLLM MCP using HTTP transport with server-specific authentication:
Server URL:
litellm_proxy
Headers:
x-litellm-api-key: Bearer YOUR_LITELLM_API_KEY
x-mcp-github-authorization: Bearer YOUR_GITHUB_TOKEN
x-mcp-zapier-x-api-key: YOUR_ZAPIER_API_KEY
Connect via Streamable HTTP Transport with Legacy Auth
Connect to LiteLLM MCP using HTTP transport with MCP authentication:
Server URL:
litellm_proxy
Headers:
x-litellm-api-key: Bearer YOUR_LITELLM_API_KEY
x-mcp-auth: Bearer YOUR_MCP_AUTH_TOKEN
This URL can be used with any MCP client that supports HTTP transport. The x-mcp-auth header will be forwarded to your MCP server for authentication.
Connect via Python FastMCP Client with Server-Specific Auth
Use the Python FastMCP client to connect to your LiteLLM MCP server with server-specific authentication:
import asyncio
import json

from fastmcp import Client
from fastmcp.client.transports import StreamableHttpTransport

# Create the transport with your LiteLLM MCP server URL and server-specific auth headers
server_url = "litellm_proxy"
transport = StreamableHttpTransport(
    server_url,
    headers={
        "x-litellm-api-key": "Bearer YOUR_LITELLM_API_KEY",
        "x-mcp-github-authorization": "Bearer YOUR_GITHUB_TOKEN",
        "x-mcp-zapier-x-api-key": "YOUR_ZAPIER_API_KEY"
    }
)

# Initialize the client with the transport
client = Client(transport=transport)


async def main():
    # Connection is established here
    print("Connecting to LiteLLM MCP server with server-specific authentication...")
    async with client:
        print(f"Client connected: {client.is_connected()}")

        # Make MCP calls within the context
        print("Fetching available tools...")
        tools = await client.list_tools()

        print(f"Available tools: {json.dumps([t.name for t in tools], indent=2)}")

        # Example: Call a tool (replace 'tool_name' with an actual tool name)
        if tools:
            tool_name = tools[0].name
            print(f"Calling tool: {tool_name}")

            # Call the tool with appropriate arguments
            result = await client.call_tool(tool_name, arguments={})
            print(f"Tool result: {result}")


# Run the example
if __name__ == "__main__":
    asyncio.run(main())
Connect via Python FastMCP Client with Legacy Auth
Use the Python FastMCP client to connect to your LiteLLM MCP server with MCP authentication:
import asyncio
import json

from fastmcp import Client
from fastmcp.client.transports import StreamableHttpTransport

# Create the transport with your LiteLLM MCP server URL and auth headers
server_url = "litellm_proxy"
transport = StreamableHttpTransport(
    server_url,
    headers={
        "x-litellm-api-key": "Bearer YOUR_LITELLM_API_KEY",
        "x-mcp-auth": "Bearer YOUR_MCP_AUTH_TOKEN"
    }
)

# Initialize the client with the transport
client = Client(transport=transport)


async def main():
    # Connection is established here
    print("Connecting to LiteLLM MCP server with authentication...")
    async with client:
        print(f"Client connected: {client.is_connected()}")

        # Make MCP calls within the context
        print("Fetching available tools...")
        tools = await client.list_tools()

        print(f"Available tools: {json.dumps([t.name for t in tools], indent=2)}")

        # Example: Call a tool (replace 'tool_name' with an actual tool name)
        if tools:
            tool_name = tools[0].name
            print(f"Calling tool: {tool_name}")

            # Call the tool with appropriate arguments
            result = await client.call_tool(tool_name, arguments={})
            print(f"Tool result: {result}")


# Run the example
if __name__ == "__main__":
    asyncio.run(main())
Customize the MCP Auth Header Name
By default, LiteLLM uses x-mcp-auth to pass your credentials to MCP servers. You can change this header name in one of the following ways:
- Set the
LITELLM_MCP_CLIENT_SIDE_AUTH_HEADER_NAMEenvironment variable
export LITELLM_MCP_CLIENT_SIDE_AUTH_HEADER_NAME="authorization"
- Set the
mcp_client_side_auth_header_namein the general settings on the config.yaml file
model_list:
  - model_name: gpt-4o
    litellm_params:
      model: openai/gpt-4o
      api_key: sk-xxxxxxx

general_settings:
  mcp_client_side_auth_header_name: "authorization"
Using the authorization header
In this example the authorization header will be passed to the MCP server for authentication.
curl --location '<your-litellm-proxy-base-url>/v1/responses' \
--header 'Content-Type: application/json' \
--header "Authorization: Bearer $LITELLM_API_KEY" \
--data '{
    "model": "gpt-4o",
    "tools": [
        {
            "type": "mcp",
            "server_label": "litellm",
            "server_url": "litellm_proxy",
            "require_approval": "never",
            "headers": {
                "x-litellm-api-key": "Bearer YOUR_LITELLM_API_KEY",
                "authorization": "Bearer sk-zapier-token-123"
            }
        }
    ],
    "input": "Run available tools",
    "tool_choice": "required"
}'
LiteLLM Proxy - Walk through MCP Gateway
LiteLLM exposes an MCP Gateway for admins to add all their MCP servers to LiteLLM. The key benefits of using LiteLLM Proxy with MCP are:
- Use a fixed endpoint for all MCP tools
- MCP Permission management by Key, Team, or User
This video demonstrates how you can onboard an MCP server to LiteLLM Proxy, use it and set access controls.
LiteLLM Python SDK MCP Bridge
LiteLLM Python SDK acts as a MCP bridge to utilize MCP tools with all LiteLLM supported models. LiteLLM offers the following features for using MCP
- List Available MCP Tools: OpenAI clients can view all available MCP tools
litellm.experimental_mcp_client.load_mcp_toolsto list all available MCP tools
- Call MCP Tools: OpenAI clients can call MCP tools
litellm.experimental_mcp_client.call_openai_toolto call an OpenAI tool on an MCP server
1. List Available MCP Tools
In this example we'll use litellm.experimental_mcp_client.load_mcp_tools to list all available MCP tools on any MCP server. This method can be used in two ways:
format="mcp"- (default) Return MCP tools- Returns:
mcp.types.Tool
- Returns:
format="openai"- Return MCP tools converted to OpenAI API compatible tools. Allows using with OpenAI endpoints.- Returns:
openai.types.chat.ChatCompletionToolParam
- Returns:
- LiteLLM Python SDK
- OpenAI SDK + LiteLLM Proxy
# Create server parameters for stdio connection
from mcp import ClientSession, StdioServerParameters
from mcp.client.stdio import stdio_client
import os
import litellm
from litellm import experimental_mcp_client


server_params = StdioServerParameters(
    command="python3",
    # Make sure to update to the full absolute path to your mcp_server.py file
    args=["./mcp_server.py"],
)

async with stdio_client(server_params) as (read, write):
    async with ClientSession(read, write) as session:
        # Initialize the connection
        await session.initialize()

        # Get tools
        tools = await experimental_mcp_client.load_mcp_tools(session=session, format="openai")
        print("MCP TOOLS: ", tools)

        messages = [{"role": "user", "content": "what's (3 + 5)"}]
        llm_response = await litellm.acompletion(
            model="gpt-4o",
            api_key=os.getenv("OPENAI_API_KEY"),
            messages=messages,
            tools=tools,
        )
        print("LLM RESPONSE: ", json.dumps(llm_response, indent=4, default=str))
In this example we'll walk through how you can use the OpenAI SDK pointed to the LiteLLM proxy to call MCP tools. The key difference here is we use the OpenAI SDK to make the LLM API request
# Create server parameters for stdio connection
from mcp import ClientSession, StdioServerParameters
from mcp.client.stdio import stdio_client
import os
from openai import OpenAI
from litellm import experimental_mcp_client

server_params = StdioServerParameters(
    command="python3",
    # Make sure to update to the full absolute path to your mcp_server.py file
    args=["./mcp_server.py"],
)

async with stdio_client(server_params) as (read, write):
    async with ClientSession(read, write) as session:
        # Initialize the connection
        await session.initialize()

        # Get tools using litellm mcp client
        tools = await experimental_mcp_client.load_mcp_tools(session=session, format="openai")
        print("MCP TOOLS: ", tools)

        # Use OpenAI SDK pointed to LiteLLM proxy
        client = OpenAI(
            api_key="your-api-key",  # Your LiteLLM proxy API key
            base_url="http://localhost:4000"  # Your LiteLLM proxy URL
        )

        messages = [{"role": "user", "content": "what's (3 + 5)"}]
        llm_response = client.chat.completions.create(
            model="gpt-4",
            messages=messages,
            tools=tools
        )
        print("LLM RESPONSE: ", llm_response)
2. List and Call MCP Tools
In this example we'll use
litellm.experimental_mcp_client.load_mcp_toolsto list all available MCP tools on any MCP serverlitellm.experimental_mcp_client.call_openai_toolto call an OpenAI tool on an MCP server
The first llm response returns a list of OpenAI tools. We take the first tool call from the LLM response and pass it to litellm.experimental_mcp_client.call_openai_tool to call the tool on the MCP server.
How litellm.experimental_mcp_client.call_openai_tool works
- Accepts an OpenAI Tool Call from the LLM response
- Converts the OpenAI Tool Call to an MCP Tool
- Calls the MCP Tool on the MCP server
- Returns the result of the MCP Tool call
- LiteLLM Python SDK
- OpenAI SDK + LiteLLM Proxy
# Create server parameters for stdio connection
from mcp import ClientSession, StdioServerParameters
from mcp.client.stdio import stdio_client
import os
import litellm
from litellm import experimental_mcp_client


server_params = StdioServerParameters(
    command="python3",
    # Make sure to update to the full absolute path to your mcp_server.py file
    args=["./mcp_server.py"],
)

async with stdio_client(server_params) as (read, write):
    async with ClientSession(read, write) as session:
        # Initialize the connection
        await session.initialize()

        # Get tools
        tools = await experimental_mcp_client.load_mcp_tools(session=session, format="openai")
        print("MCP TOOLS: ", tools)

        messages = [{"role": "user", "content": "what's (3 + 5)"}]
        llm_response = await litellm.acompletion(
            model="gpt-4o",
            api_key=os.getenv("OPENAI_API_KEY"),
            messages=messages,
            tools=tools,
        )
        print("LLM RESPONSE: ", json.dumps(llm_response, indent=4, default=str))

        openai_tool = llm_response["choices"][0]["message"]["tool_calls"][0]
        # Call the tool using MCP client
        call_result = await experimental_mcp_client.call_openai_tool(
            session=session,
            openai_tool=openai_tool,
        )
        print("MCP TOOL CALL RESULT: ", call_result)

        # send the tool result to the LLM
        messages.append(llm_response["choices"][0]["message"])
        messages.append(
            {
                "role": "tool",
                "content": str(call_result.content[0].text),
                "tool_call_id": openai_tool["id"],
            }
        )
        print("final messages with tool result: ", messages)
        llm_response = await litellm.acompletion(
            model="gpt-4o",
            api_key=os.getenv("OPENAI_API_KEY"),
            messages=messages,
            tools=tools,
        )
        print(
            "FINAL LLM RESPONSE: ", json.dumps(llm_response, indent=4, default=str)
        )
In this example we'll walk through how you can use the OpenAI SDK pointed to the LiteLLM proxy to call MCP tools. The key difference here is we use the OpenAI SDK to make the LLM API request
# Create server parameters for stdio connection
from mcp import ClientSession, StdioServerParameters
from mcp.client.stdio import stdio_client
import os
from openai import OpenAI
from litellm import experimental_mcp_client

server_params = StdioServerParameters(
    command="python3",
    # Make sure to update to the full absolute path to your mcp_server.py file
    args=["./mcp_server.py"],
)

async with stdio_client(server_params) as (read, write):
    async with ClientSession(read, write) as session:
        # Initialize the connection
        await session.initialize()

        # Get tools using litellm mcp client
        tools = await experimental_mcp_client.load_mcp_tools(session=session, format="openai")
        print("MCP TOOLS: ", tools)

        # Use OpenAI SDK pointed to LiteLLM proxy
        client = OpenAI(
            api_key="your-api-key",  # Your LiteLLM proxy API key
            base_url="http://localhost:8000"  # Your LiteLLM proxy URL
        )

        messages = [{"role": "user", "content": "what's (3 + 5)"}]
        llm_response = client.chat.completions.create(
            model="gpt-4",
            messages=messages,
            tools=tools
        )
        print("LLM RESPONSE: ", llm_response)

        # Get the first tool call
        tool_call = llm_response.choices[0].message.tool_calls[0]

        # Call the tool using MCP client
        call_result = await experimental_mcp_client.call_openai_tool(
            session=session,
            openai_tool=tool_call.model_dump(),
        )
        print("MCP TOOL CALL RESULT: ", call_result)

        # Send the tool result back to the LLM
        messages.append(llm_response.choices[0].message.model_dump())
        messages.append({
            "role": "tool",
            "content": str(call_result.content[0].text),
            "tool_call_id": tool_call.id,
        })

        final_response = client.chat.completions.create(
            model="gpt-4",
            messages=messages,
            tools=tools
        )
        print("FINAL RESPONSE: ", final_response)